Locations:

Proper Lifting Technique: How To Protect Your Back, Shoulders and Everything Else

Planning and practicing proper form can help keep you safe from injury

Whether you’re clearing out the basement, putting seasonal decorations in the attic or bringing home a new bookshelf, we can all get a little overconfident in our ability to carry heavy stuff. Next thing you know, you’re searching the medicine cabinet for pain relievers.

Advertisement

Cleveland Clinic is a non-profit academic medical center. Advertising on our site helps support our mission. We do not endorse non-Cleveland Clinic products or services. Policy

But consistently using proper lifting technique can protect you from serious injuries.

We talked with sports and exercise medicine physician Matthew Kampert, DO, about the do’s and don’ts of lifting.

Why safe lifting technique is important

Improper lifting can lead to trouble with your:
  • Back: Strains, sprains, disk damage and injuries to the small joints connecting your vertebrae are common hazards.
  • Shoulders: Poor form and accidents can lead to injuries to your rotator cuff, labrum and scapula.
  • Hands and feet: Crush injuries are common when objects shift, fall or are set down carelessly.

Proper lifting method

Proper lifting technique

There are right and wrong ways to pick up, carry and set down heavy loads.

If you think about it, you wouldn’t go to the gym, grab the heaviest thing you can find and hope for the best. So, why would you at home?

“The body mechanics that protect a 400-pound deadlift are the same ones that protect you when you pick up a toddler or lift a box onto a shelf,” Dr. Kampert says.

Dr. Kampert offers tips for each phase of moving heavy items from place to place.

Preparing to lift

Before you move that mattress, refrigerator or dining room table, it’s best to be prepared.

  • Assess before you engage. Test the weight before committing to the full lift. Nudge the object slightly or lift one corner.
  • Warm up. Cold, stiff muscles are more prone to strain. Get your blood flowing with two or three minutes of exercises like bodyweight squats, hip circles, cat-cow stretches, arm circles and overhead reaches.
  • Choose appropriate footwear. Closed-toe shoes with a firm, noncompressible sole give you a stable base and protect against dropped-object injuries. “This matters more than people expect,” Dr. Kampert notes. “Ankle and foot stability directly influences how well force transfers through your trunk and into your shoulders.”
  • Use aids. Consider whether you’d benefit from a dolly, hand truck, lifting strap, weightlifting belt or a second set of hands. Don’t try to be a hero.
  • Plan your path. Walk the route with your arms free. Is the path clear of trip hazards, like stairs, thresholds, pets or clutter? “The number of injuries I see from someone twisting mid-carry to avoid an obstacle they didn't anticipate is genuinely striking,” Dr. Kampert shares.

Advertisement

Committing to the lift

Proper lifting technique is a matter of properly engaging each part of your body. Follow these steps.

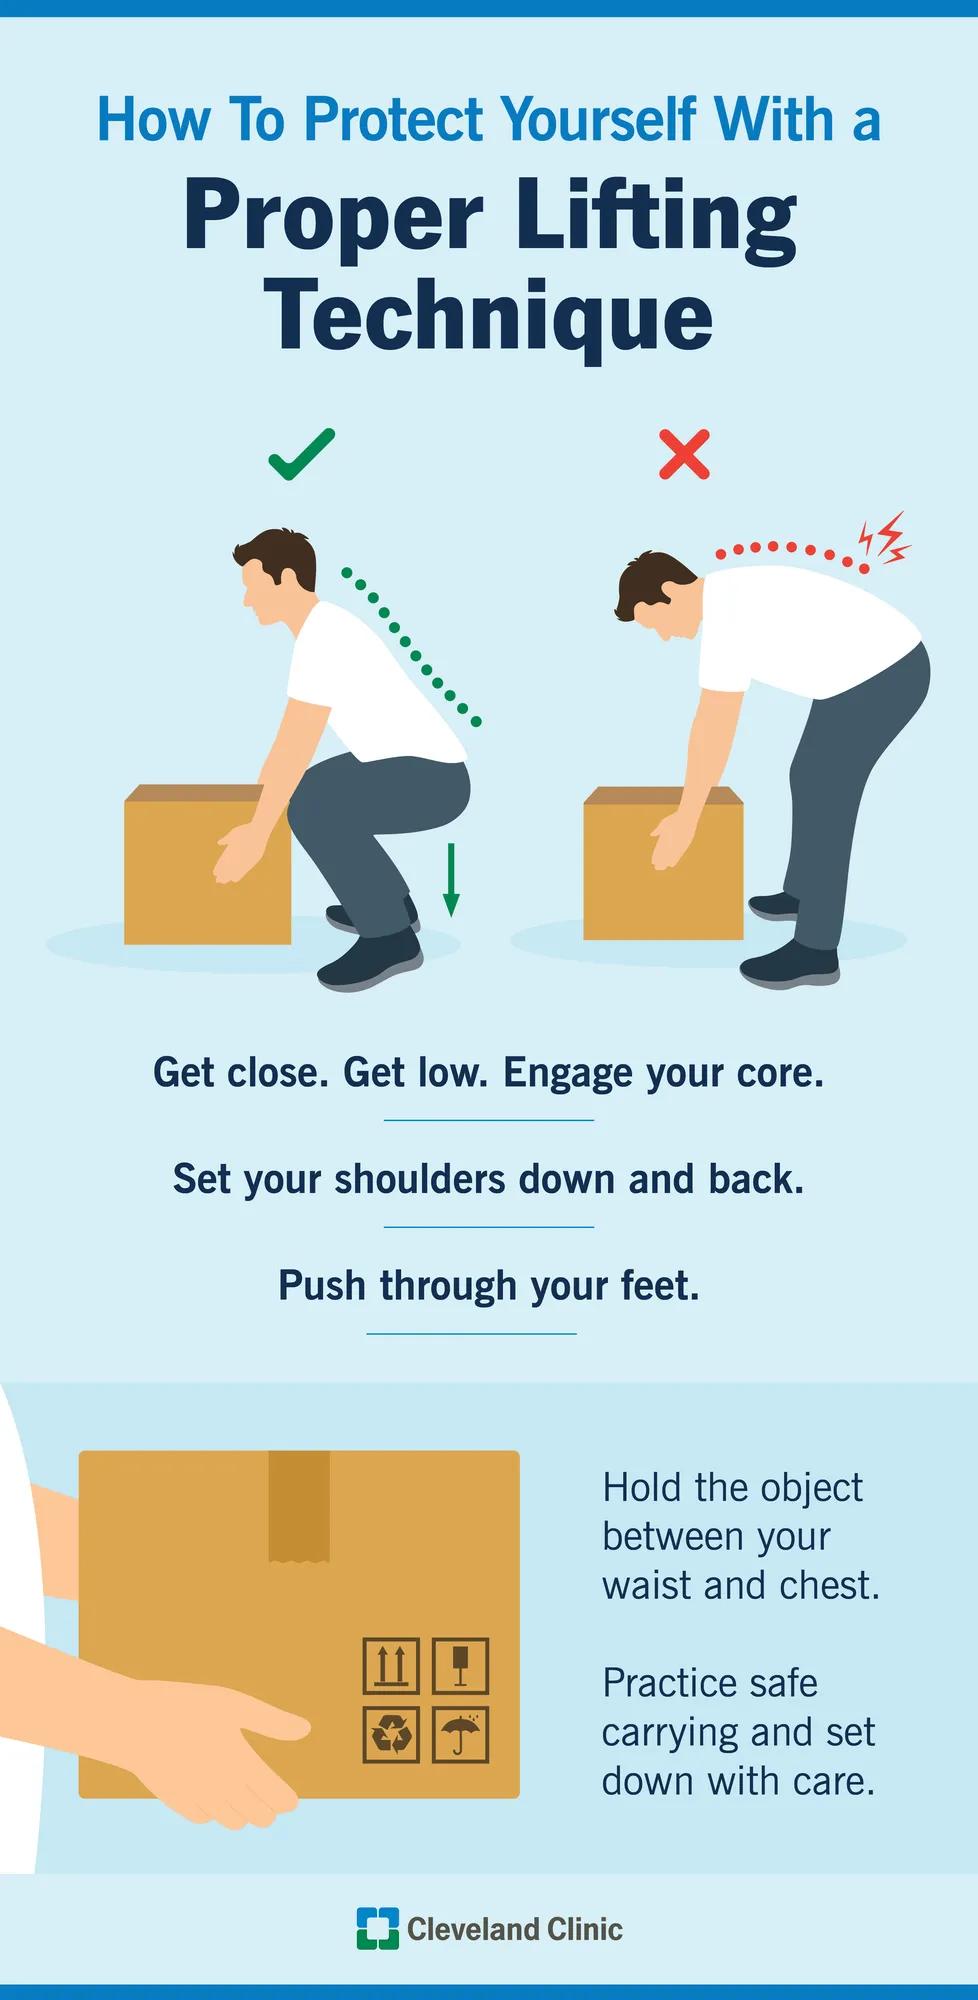
  1. Set your feet. They should be between hip-width and shoulder-width distance apart to provide a stable base.
  2. Get low. Hinge at your hips and bend your knees. Maintain the natural inward curve of your lower back. Don’t round your spine.
  3. Hold on tight. Get a full, secure grip before you commit to lifting. If you don’t have a good handle on the object, adjust your hand position.
  4. Engage your core. “Brace yourself as if you’re about to be poked in the stomach from any direction: front, sides and back,” Dr. Kampert advises.
  5. Set your shoulders. Think “Proud chest. Shoulders back and down.” In other words, keep from shrugging them up to your ears.
  6. Push through your feet. Initiate the lift by driving through your heels and extending your hips and knees.
  7. Keep it close. You want the object’s center of mass as close to you as possible. “Holding a 20-pound box at arm’s length is dramatically harder on your back than holding the same box against your chest,” Dr. Kampert explains.

Practicing safe carrying

The lift is only the beginning. “The carry phase is where fatigue-related breakdowns often happen, in both the spine and the shoulders,” Dr. Kampert warns.

Follow these tips:

  • Keep it centered. Hold the object between your waist and chest. That’s directly in front of your body’s center of mass.
  • Take shorter, more controlled steps. Long strides while carrying heavy loads increase instability. Smaller steps are especially important on uneven terrain, stairs or when what you’re carrying gets in the way of seeing clearly in front of you.
  • Turn, don’t twist. If you need to change direction, turn your feet and let your hips and shoulders rotate together as a unit. Twisting your torso while your feet stay planted can be a recipe for disc injury.
  • Watch your grip. As your forearm and hand muscles get tired, your grip on the object weakens and leaves you vulnerable to dropping things. “Grip fatigue also has a downstream effect on your shoulder,” Dr. Kampert says. “If you feel your hands slipping, set the object down under control to reset rather than trying to carry on.”

Set down with care

“This phase often gets rushed,” Dr. Kampert acknowledges. “But the biomechanics are identical to the lift, just in reverse — and often under more fatigue.”

Reverse the lift with the same control you used when lifting:

  • Hinge at your hips.
  • Bend your knees.
  • Keep the object close.
  • Keep your core braced and your shoulders down and back.
  • Don’t let go until the object is stable.
  • Watch your fingers and toes to the very end.

Advertisement

“Resist the urge to simply release the object once you’re ‘close enough,’” Dr. Kampert advises. “A controlled, gradual descent avoids a sudden loading spike on your spine, shoulders and joints.”

Take care of yourself after a heavy lifting day

You may feel tired, sore or stiff after a day of hauling bags of mulch around the yard. But even if you don’t feel the effects, it’s important to take care of your body after physically demanding work.

“Recovery isn’t just about addressing pain that’s already present,” Dr. Kampert clarifies. “It’s about supporting tissue repair before minor stress becomes cumulative damage.”

What should you do?

  • Keep moving (gently). Do some light activity, like walking and stretching, to increase blood flow to the affected muscles.
  • Hydrate deliberately. Drinking plenty of water can help your body deliver nutrients to your muscles and clear away waste produced during physical activity.
  • Get protein. The amino acids in protein support muscle repair and rebuilding.
  • Prioritize sleep. Your body releases growth hormone and repairs tissue when you sleep.
  • Use ice for new pains. “Ice is most useful in the first 24 to 48 hours after a specific, acute injury, like a strain, sharp pain, swelling or clearly identifiable something happened moment,” Dr. Kampert recommends.
  • Try heat for general soreness and stiffness. Heat increases local blood flow, which can ease stiffness and make it more comfortable to move around.
  • Know when to seek medical care. Seek treatment for pain that’s sharp, radiates down an arm or leg, is accompanied by numbness or weakness, or doesn’t meaningfully improve within a few days of self-care.

Advertisement

“In my clinical experience, people who wait weeks or months before addressing persistent post-lifting pain often end up with more complicated issues that take longer to resolve than if they'd been assessed early,” Dr. Kampert notes.

Advertisement

Cleveland Clinic icon
Health Essentials logo
Subscription icon

Better health starts here

Sign up for our Health Essentials emails for expert guidance on nutrition, fitness, sleep, skin care and more.

Learn more about our editorial process.

Related Articles

Person planking on a vibration plate
November 5, 2026/Exercise & Fitness

Vibration Plates and Their Benefits

Research hints at improved strength, balance, blood flow and weight loss, but more evidence is needed
Person using TRX suspension trainer at gym
September 18, 2026/Exercise & Fitness

How Best To Use Suspension Trainers for Your TRX Workout

It helps to build up your strength and balance before tackling these more resistance-heavy TRX exercises
Person doing glute bridges with band resistance
August 25, 2026/Exercise & Fitness

Build Lower-Body Strength One Bridge at a Time

Glute bridges are simple bodyweight exercises worth adding to any workout

Two older people with foam weights doing water areobics in the pool
August 11, 2026/Exercise & Fitness

Looking for Low-Impact Exercises? Try Water Aerobics

Stay afloat with bicycle kicks, alternating punches and water jogging
People doing box jumps at gym
July 29, 2026/Exercise & Fitness

Blow Up Your Exercise Routine With Plyometrics

Plyometric training uses explosive movements to improve speed, power and agility
People circuit training, moving from one exercise station to another
July 20, 2026/Exercise & Fitness

Try Circuit Training for a Fast, Flexible Workout

Circuit training combines strength and cardio exercises into one efficient workout

Person running up rugged terrain on mountain trail
July 13, 2026/Exercise & Fitness

Is There a Difference Between Stamina and Endurance?

One helps with quick, intense bursts, while the other helps carry you for the long haul

Person outside, working out, about to sneeze
July 8, 2026/Exercise & Fitness

Should You Work Out When You’re Sick?

It depends on your symptoms and where you feel them in your body, but you may want to sit this one out
Trending Topics

Hand of person writing in a journel, with photographs tucked in the pages

How (and Why) To Start Gratitude Journaling

This simple practice can help you notice what’s meaningful, comforting or going well

A maca root next to a bowl of maca powder

Is Maca Root Good for You?

Maca root supplements claim benefits like sexual health, menopause symptom relief and more energy — but human research is limited

Person holding eyebrow pencil up to their eyebrows

Is It Possible To Grow Eyebrows Back?

It can take a few months — and you’ll need to put down the tweezers to give your brows time to recover

Ad